
Van Conversion
Building a Motorhome
DISCLAIMER : These are general notes that may help you with the build sequence.
Installation of electrics and lpg gas must be done by professional tradesmen.
Any structural alterations to the vehicle must be approved by a State authorised vehicle inspector and Blue Plate issued.
The notes below are to be used as a guide only. When in doubt seek professional advice.
Your van purchase obviously will be the most important decision.
Be it a new or used Cargo Van or partially completed Van/Bus, it MUST suit your needs.
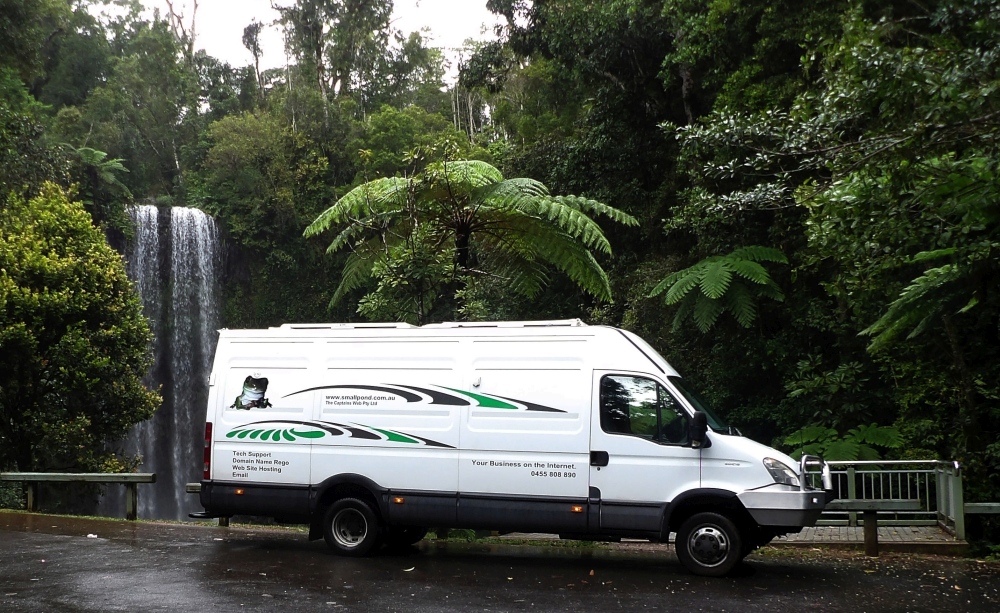
This is a custom conversion of a second-hand IVECO Daily 50C18 to a Home/Office. Yours will differ but the basics are similar.
Try to avoid prepurchasing major items until their installation time. Hording is fine but it is important to have enough room to fit larger items.
It can be a disaster to find that the expensive item your prepurchased before you started on your van conversion will not fit.
EBay was an excellent source for just about everything if you live in an area that is remote from major towns.
Overseas orders are slow in delivery so some preplanning is required.
Previous experience building 140 tonne steel passenger vessels. This is a similar build, fitted into a shoebox.
The build took 7 months part time. I have tried to include traps to avoid when embarking on a DIY fitout.
INDEX |
Official Documentation
- Motorhome requirements - Australia
- Light Vehicle Construction and Modification - LK1/LK2 seating
- QLD Vehicle Modification - G19.4
Planning
- Drawings
- Scaled drawings on graph paper will give you an idea on how to fit everything in. Be patient, paper is cheap.
- Beds first as they demand a lot of floor area. Planning will differ depending on the sized of the van.
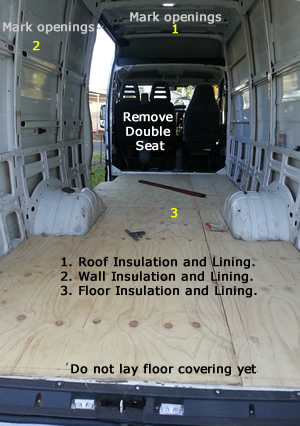
- Where to start on the conversion?
- Plan the roof first - skylights, external solar panels and internal lighting
- Plan your electrical AC and DC wiring runs (conduited) - if in doubt run extra cables ! The fuse box should be located near your side shore power outlet. Plan your cable runs from the fuse box down either side of the Van.
- Mark out roof cuts for sky lights allowing room for the solar panels. This will give you a guide when it comes to insulation.
- In this case there is a central skylight plus a smaller skylight vent/fan over the toilet/shower
- If you require side windows, mark out the side wall cuts.
- Mark out the side vents. Note that gas cylinders must be isolated from the interior and vented to the outside. The same applies to gas heaters.
- Plan the roof first - skylights, external solar panels and internal lighting
- Colour code your cuts on the van interior. This gives you perspective. Measure everything again!
Initial Electrical Wiring
- Run your low and high voltage wiring. Allow plenty of excess (looped and labled at each end).
- The wiring must meet Australian Standards.
- DC wiring must err on the heavy side to avoid voltage drops on the longer runs.
- Domestic 12v Battery to fuse box and solar regulator should be 2 core automotive 6mm or over
- Inverter and multiple battery connections should be 12 to 15mm OD.
- AC wiring. Use domestic 10amp (lighting) and 15amp (shore power, power points, inverter)
- Sikaflex the conduit to the ceiling from the fusebox position. Allow adequate runs across the roof and lengthwise from the cabin to the rear doors. Repeating: give yourself plenty of excess wire and lable the function at the end of each run.
- Be very careful of sharp metal edges that will cut wiring over time.
- The wiring must meet Australian Standards.
- Allow at least 4 camera cable runs to the rear of the van to the cabin.
- If you are using proximity reversing sensors, run the wiring for these.
Insulation
- Types of Insulation.
- Spray foam is probably the best because it covers irregular surfaces like pressed steel and panel strengtheners. It is the most expensive
- Spray foam can be applied to an empty van - roof, sides and floor.
- Reflective sheeting with a foam core is effective particularly if there is an airgap between the battens and the roof
- Insulation Batts like Rockwool are good air gap fill between the battens.
- After running the electric cables, start with the insulation.
- Spray foam is probably the best because it covers irregular surfaces like pressed steel and panel strengtheners. It is the most expensive
- batten out the roof to ensure a level fastening platform for the roof panelling. Sikaflex (See Fastenings) the battens to the roof. This a tedious job if there is multi levels in the roof structure
- Stick ceiling insulation batts to roof using temporary contact glue to hold them up. A generous thickness is needed but must compress comfortably when the roof lining goes up.

Electrics
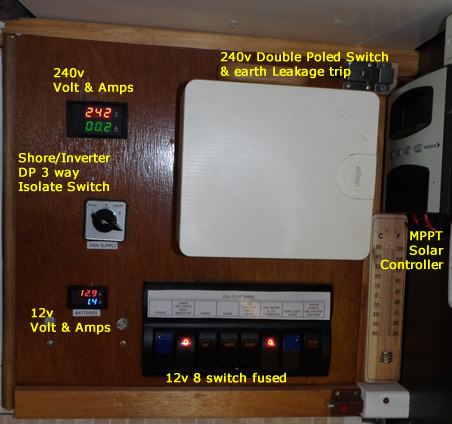
- Low (12v,24v) and High voltage (240v).
- Switches and Electric Panel
- Motorhomes have to have double poled switching and GPO power sockets
- The 240v fuse box needs double poled breakers (10amp and 15 outlets)
- The Shore Power/Inverter change over switch has to be double poled
- 240v Earth leakage safety trip must be neutral to earth because of the internal Inverter power.
- The 12v panel is multiple rocker switched with automotive fuses to suit the switch application.
- Meters for both 12v and 240v display voltage and amperage draw on Panel face
- House Batteries
- Battery technology is developing very quickly. Generally the latest storage techniques are the most expensive.
- Avoid lead acid batteries and go for a deep cycle AGM (absorbed glass matt) or gel cell. Lithium based storage (aircraft) is expensive
- Calculate your storage needs. In this case I have a bank of three gell batteries with a total of 400ah.
- Keep your low voltages the same. 12v is the most common and useful for running domestic DC equipment.
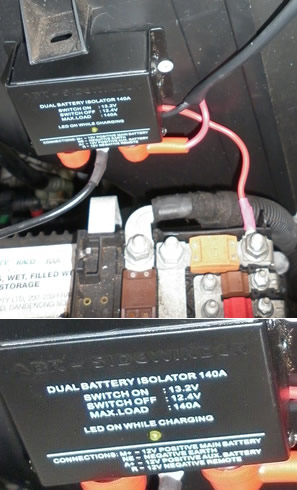
- Vehicle Battery
- A heavy duty battery isolator switch installed in the engine bay
- This allows a trickle charge from the alternator to the house batteries when the truck battery is full.
- At this stage I have not installed an additional crank battery in the engine bay
- Inverter
- Calculate your needs. Off my 400ah battery bank I run a Pure Sine Wave 1700w continuous (3400w surge) 12v to 240v inverter
- 240v appliances that will run individually off the 400ah battery bank with the above inverter are: 800w microwave, 1000w Airconditioner or a 1000w small kettle.
Note that extended aircon running time will drop the battery storage quickly. The battery bank handles air conditioning - 3 hrs at 1000w - OK
- Lighting
- LED all the way. Warm White is not as harsh as Cool White.
- 240v LEDs and higher wattage 12v need airspace because of the heat sinks
- More reading
Van Seating
- The seating capacity must be the same or more than the beds in the Van
- Planning a Cabin Walkthrough
- If altering the seating structurally, then the alterations MUST be approved by an engineer
- Rotating captains chairs can be purchased off the shelf but these can be expensive.
- Generally the comfort of commercial van seating is poor and have 3 person cross seating with a cargo wall.
These have to be removed to allow for the walkthrough. - Comfortable seating can be found at the wreckers - choose a recent model with a known brand name. When it comes to inspect the modifications, details of the seats should be supplied.
- Seats
- New Passenger and Drivers seats must conform to LK1 and LK2 in the Official Documentation - (see above)
- Fastenings must be metal to metal
- Seat Belts
- Try and use the vans existing seat belts
- If this is not possible, use the same three point anchoring system with approved belting and high tensile fastenings.
- Watch for existing seat belt electrics to the onboard computer or dash
- Planning a Cabin Walkthrough
Plumbing
- Choose a 12v water pump that does not have an extremely high pressure cutout. 40psi is about right.
- Reinforced plastic housing made specifically for water will handle 40 psi and is easy to work with
- Do not use clear plastic piping or any piping that is not food grade because you will risk a plastic taint in the domestic water supply.
- Use plastic hose for your cold water runs and copper piping for your hot water runs.
- External water connections
- To protect the van from the varying mains pressures, a pressure regulator should be fitted
- The regulator drops the mains pressure to your van's pressure of 40psi.
- Grey Water
- National Parks and Caravan Parks require grey water to be disposed of in an environmentally responsible way.
- If your van is small then the sink waste can be caught in an portable plastic drum underneath.
- Vans and Motorhomes sink and shower waste should be plumbed accordingly.
- If there is room, a grey water tank can be installed with accessible valve drainage.
- You may have to demonstrate to a Park Ranger your grey water facilities.
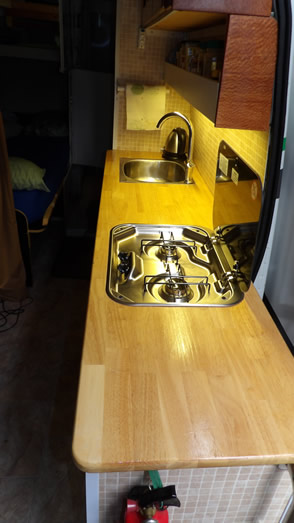
Benchtops
- Standard kitchen benchtops are a little too wide (600mm) to use in a van. They can be easily modified to fit. An unrestricted corridor to the rear of the van can be achieved by reducing the benchtop width.
- Install a temporary ply benchtop. The width of the sink and stove will dictate how wide the benchtop will be.
- Cut the sink and stove openings.
- Fit the sink and the stove. This ply benchtop can now be used as an accurate template.
- Check sink drainage. Check space for water pipes to the sink from the pump.
- Check space for gas piping from the external cylinder to the stove
- Plan your cupboard space below. You can sometimes fit premade kits from IKEA as a neat fix for cutlery and pot draws
- Try and get as much bench space length as possible. This will be your work area for just about everything.
- Delay the installation of the permant benchtop as long as possible to protect it from other construction in the van.
- The permanent benchtop should be water resistant as it will house the sink and will be exposed when the sliding door is opened.
Fastenings
- Unfortunately the most reliable fastening to the metal van panels without penetration is Sikaflex. It is expensive. Marine grade white is recommended as black is harder to clean. Other contact and single pot glues tend to break down from roof heat.
- Utilize the internal metal bulkheads. They make a very solid base when using metal screws.
- Every other material used in the internal construction of the van should be screwed. You are building strong to counter the road vibration and movement.
Water Storage
- Under Van storage will differ. In this case the spare tire was removed. The retro fitted towbar interfered with mounting off-the-shelf water storage so a custom stainless 300 ltr tank had to be fitted.
- Water Tanks
- Try to get a standard plastic water tank (98lts) under the van. Shift the spare tire if necessary
- Make sure the tank under the chassis does not infringe too much on your ground clearance and exit angle.
- A sheet metal stone guard is essential for the black plastic water tanks.
- The fill pipe and connections should also be protected from stone damage.
- Do not use clear plastic piping or any piping that is not food grade because you will risk a plastic taint in the domestic water supply.
- Water Indicators and Sender Unit
- The simplest level indicator is a sight glass on the side of the tank. The disadvantage is the sight glass is usually in an awkward location so is are not checked regularly.
- A sender unit to a gauge that is located in an area you frequent (eg sink) is a safer proposition.
- An Australian Manufacturer can be found here.
Lining
- Roof lining is done first.
- Use water resistant 3mm sheeting to counter any moisture from internal water vapour.
- Sandwich insulation foil is glued to the back of the lining.
- Cut openings for overhead lights if recessed, the skylight openings and roof Air-conditioning
- The lining will hold up the rock wool heat batts.
- The insulated roof lining can be sikaflexed or screwed to the wood battens or fastened directly into the metal roof beams.
- Wall Lining
- 3mm to 4mm sheeting that will flex to the curves in the side of the van
- Cheap ply can be used where the walls are covered or hidden by fixtures
- If painting walls, the ply lining should have one smooth surface
- The wall lining will hold up the rock wool sound batts.
- The sheeting can be sikaflexed to the wood battens or screwed directly into the wall strengtheners.
- Window openings are to be cut out
- Flooring
- Insulation beneath the floor lining can be sandwich foil as it compresses well
- Avoid thick floor insulation because a flexible floor may lead to loosening fastenings
- 10mm ply fastened with metal screws to the high ridges of the pressed metal flooring
- Do not cover until all the fixtures are in.
Bulkheads
- 12 to 18mm ply cut by template marking. The curved roof and sides make fitting tricky.
- Sikaflex to wall, floor and roof. This provides a solid wall and anything fastened to it tends to strengthen the whole structure.
- Delay through bulkhead openings until you are certain of the positioning of pipe runs etc.
Vents
- Australian red dust will penetrate more if the van has less internal pressure compared to the outside.
- Remove existing whirlygigs (extractors) on the roof.
- Offroad advocates suggest running the cabin A/C with fresh air on (not recycling internally). This allows for fresh air to be pumped into the interior giving a slight positive pressure
- The installation of dorade box on the roof can provide a positive air scoop
- Vent Openings
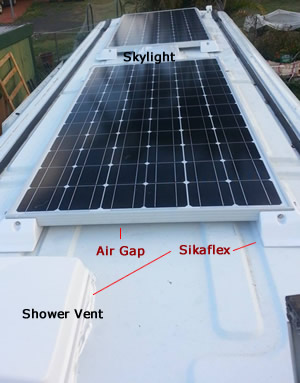
- Centre roof and shower skylight provide hinged venting
- Shower vent with inbuilt fan allows both extraction or blower via a three way switch.
- Consideration must be given to adequate venting around the refrigerator/freezer and the microwave.
- Space constraints make it difficult to install an extractor above the stove. Remember the sliding door may block off vents when open.
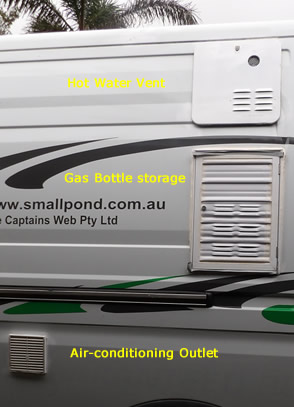
- Gas
- Gas storage cylinder and gas hot water must be isolated from the interior and vented to the outside.
Beds
- Beds take up a lot of floor space. There are some ingenious solutions on the internet to solve this problem.
There are folding, chair/table conversions, hinged and permanent beds.
- Take into account headroom and lighting as well as size
- In this van, because there is only one occupant, there is one permanent single bed and one murphy guest bed
- Here is the guest bed in operation
Airconditioning
- Roof mounted airconditioning can be an expensive item. Usually they are 12/240v.
- Alternatives are Truck cabin A/C, Portable Room A/C and Fans
- Note that with a heavy inverter installed you can run the smaller A/C on 240v
- Small 12v Blower fans are use for beds and stove extracting functions
Hot Water
- Two heater types - electric or gas. The electric element heater has a 15/20ltr storage tank. Because of space restrictions this fitout went for an instant gas system.
- As with all gas fittings - the heater has to be vented to the outside and isolated from the interior of the van.
- The gas heater must have the Australian Gas Certification and installed by a certified gas fitter. This will be part of your Vehicle Gas Certification
- Caution: There are gas heaters that are advertised as Caravan Camping Heaters - they are external use, only to be use outside the vehicle
Gas Cooking
- A two burner Gas Cooktop was installed in this case
- There are a lot of smaller mobile homes who prefer to use a camp gas cooker outside. This avoids cooking smell inside the van. The disadvantages are wind and weather.
- Interior installation must provide the required airgap around the cooker underneath the benchtop.
- Safety gas cutouts if and when a flame goes out are a mandatory requirement.
- The stove is to be connect by a certified gas fitter and is part of your Vehicle Gas Certification. Handy link here and here
Solar
- Fit as many panels as your can onto the spare roof space
- This van has 2 x 24v 200w monochrystalline panels fastened to the roof with sikaflex.
- There should be a airgap between the roof and the panelling to allow cooling of the cells
- Controllers
- Caution in selecting the controller because there are traps here. A 12v panel to 12v battery bank is fine for a PWM controller. If you have a PWM controller installed from a 24v panel to a 12v battery bank, it will not work.
- An MPPT controller will handle higher imput voltages - in this case 24v - and increase the charging efficiency. MPPT controllers are often twice the price of the PWM controllers.
- A combination shower/toilet was built for this van.
- Shower
- The shower cubicle is based on a prefab 800x1200 fibreglass base
- Shower and basin waste is directly through the van floor.
- The shower fitting is a mixer tap with shower hose. The shower hose is multi purpose as it also fills the basin and the toilet flush water
- The shower walls are 3mm waterproof sheeting fastened to ply backing
- A shower curtain is used as a door
- White Sikaflex used as a sealant/adhesive for the walls, floor and mirror
- Toilet
- The toilet is of the plastic cassette type (porta potti) mounted on a heavy stand to the shower floor
- Consideration made for height, ease of access and the removal of the black water waste cassette.
- The only problem encounted with toilet smells is when climbing above 1000mtrs from sea level. The waste cassette air expands past the seal.
- The shower roof vent has a 12v extractor fan inbuilt which is powerful enough to remove water vapour and smells from the cubicle
Toilet and Shower
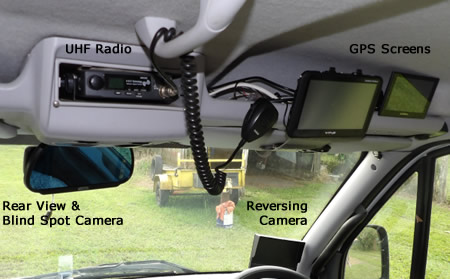
GPS
- If the van comes with an overhead locker in the cabin, mount the GPS above your head. Check the GPS aquires the satellites easily prior to mounting. The reason for this is that the screen of the GPS is difficult to see when mounted on the dash. The more modern vehicles have an inbuilt GPS.
- The fused 12v cabin overhead electrics come from the house bank in this case
- If making a new GPS purchase, go for lifetime map updates
Awning
- The height of this van dictated a mechanical wind out self supporting awning for convenience.
- The awning is mounted above the sliding door along the side of the van.
- Fastening with stainless metal screws and sikaflex sealant.
Lights
- Generally there is no need to relace the headlight existing globes with HD Xenon Lights
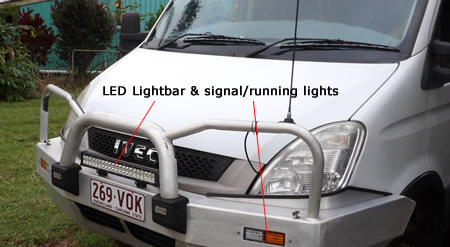
- A light bar is a good investment. Installation by an auto electrician so that there is a dash switch and the light bar automatically goes off when the dip switch is applied.
- In this case the van bullbar makes an excellent platform for a 20" 126w CREE LED spot/flood bar light.
- The lightbar should not restrict cooling airflow to the radiators.
- Bullbar indicator lights and fog/park lights are waterproof high visibilty.
Tyres
- Commercial vans run on a high PSI light truck tyre.
- The manufacturers specs are fine for the highway but no good for gravel and corregations. When you hit corrugations at full tire pressure, vibration within the van is severe. A dual cylinder air pump is required to bring the tyres up to highway pressure after running on unsealed low pressure roads.
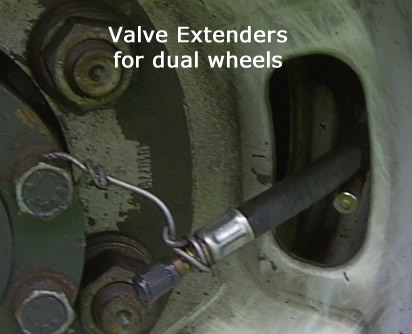
- Dual Rear wheels must have the valve stems readily accessible. This can be accomplished by valve extenders to the outside wheel.
- The spare tyre space has been replaced by the water tank and the spare tire is now located under the bunk. Dual wheels provide extra spares in an emergency.
Tools for build
- Below is a list of most used tools for the conversion. You will need some work space outside the vehicle whether it be a workshop, garage or shed.
The list excludes the obvious hand tools.
- A good battery drill with spare battery because all fittings are screwed, not nailed
- Fine toothed bench mounted mitre drop saw.
- Fine toothed circular saw.
- Jig saw.
- Work table/bench, preferrably two.
- Bench vice doubles as clamp for belt sander.
- When working by yourself, clamps are very handy
Cameras
- Camera 1 is a reversing CCD IR camera. The lens is wide angle field 170 degrees with parking lines
- Camera 2 is a rear view CCD IR camera. This camera connects to the cabin LCD clipon screen attached to the rear vision mirror. The lens should be narrow angle 90-120 degrees
- Camera 3 is a left side view CCD IR camera. This camera is a blind spot camera to the left of the vehicle. This camera also connects to the cabin clipon screen attached to the rear vision mirror. The lens should be narrow angle 90-120 degrees
- Camera 2 and 3 are switchable at the cabin screen.
- Power supply from the fused 12v house bank.
Bull Bar
- If you intend to be in the Outback for any length of time, a bull bar is a prerequisite.
- When replacing a standard bumper bar with a bull bar - ensure that the bullbar is specifically made for your van's make and model. The installation of a model specific bullbar will not interfere with the airbag system of your vehicle.
- VHS and 3G aerials can be mounted on the bullbar
- Some states only allow one aerial mounted on the lefthand side of the bullbar. Fishing rod holders, spare tire mounts and winches that protrude past the front surface of the bullbar are illegal.
- The jury is still out on the effectiveness of the "Shoo Roo" whistles
Tow Bar
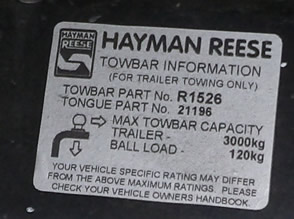
- Your maximum ball weight is stamped on the manufacturers tow bar.
- Your maximum towing weight is stamped on the manufacturers tow bar.
- Department of Transport Inspectors will look at this if you are ever pulled over with a trailer in tow.
- Watch that the tow bar does not interfere with the exit angle of the vehicle. In my case it does and I have to watch any steep guttering.
Trailers
- Types of Trailers - all will have the maximun towing weight (Aggregate Trailer Mass - ATM) stamped on the Vehicle Plate
- Caravans and 5th Wheeler
- Car Trailers
- Dolly Trailers for towing small vehicles - two wheels on the ground
- A Frame Trailers for towing small vehicles - four wheels on the ground
- Box Trailers
-
Tow weight calculations - there are important if you are pulled over and put on Department of Transport scales.
- Towing Capacity: A vehicle's towing capacity is determined by its manufacturer and is based on factors such as the design of the vehicle, the vehicle's rear axle load, the capacity of its tyres and the effect the laden trailer will have on the vehicle's attitude, stability, durability and overall safety. QLD Guide
- Trailer ATM: Stamped on plate. This is the COMBINED weight of the trailer plus payload
- Trailers over 850kgs ATM - up to 2000kg are reguired to have brakes - (electric or hydraulic)
- Trailers over 2000kgs up to 3500kgs - brakes on all wheels and breakaway system installed.